Wild Thistle Kitchen: Spiced Pumpkin Scones
By • October 8, 2020 0 874

Fall is in the air and I’m so excited to share this pumpkin scone recipe so we can all celebrate!
I’ve been slinging scones for so long. Clearly, I really love making them (and eating them). But what I really love is helping YOU make them. I’ve said it before, but one of my favorite things is helping someone have success with a recipe or a technique that they had previously had terrible luck with. Scones are one of those things! I promise if you follow my steps you will end up with delicious, flaky AND moist scones. Yes, it’s possible. Let’s make some spiced pumpkin scones! And head over to wildthistlekitchen.com for some step-by-step photos and more great recipes.
The Most Wonderful Time of the Year
The weather has been cooler here and I am in full-blown fall mode. I adore this time of year, as late summer slips into fall and everything just gets cozier and more nostalgic somehow. I woke up the other morning feeling like I just had to create a pumpkin scone recipe. So I took my tried and true vanilla bean scone and added a little bit of this and a sprinkle of that and here we go: spiced pumpkin scones! Not too sweet, just the right amount of spice and PERFECT with a hot cup of tea or coffee.
Pumpkin Scone Success Tips
I have given these tips so many times. If you are a regular, I know I sound like a broken record, but — trust me — these are the tips that have helped my family and friends make delicious, flaky, moist scones. No dried-up hockey pucks here.
- Keep your butter and your wet ingredients cold.
- Use a fork for mixing. I don’t know why, but a fork just does the best job and ensures you don’t mash and overmix the dough when adding the wet ingredients.
- Don’t worry if you have a bit of dry left in the bottom of the bowl. You can just squish it in when you’re shaping the dough. You can add a tiny bit more cream if you think it needs it, but you do not want a wet, gloppy dough here. Err on the side of too dry rather than too wet. My Vanilla Bean Sconepost has some good step-by-steps — they are old photos but they really show the texture you’re going for.
- Don’t skip the cutting and stacking step. This is THE trick to getting flaky layers in scones and biscuits.
- Also, don’t skip the freezing. It makes the pumpkin scones cut nice and evenly, but it also gives the glutens a change to relax and the flour a chance to hydrate, resulting in a tender, flaky, buttery scone.
- Make ahead.
- And finally — not really a tip, but just a cool scone bonus — once you slice and freeze these pumpkin scones, you don’t have to bake them all at once. Once they are fully frozen, you can transfer to a bag and keep in the freezer for whenever you are craving a hot, fresh scone. They bake straight from the freezer; no thawing required. Yep. Pretty cool, huh?
I hope you’ll give these a try. Don’t skip that glaze — it is so good! The cream cheese just balances it all out. And let me know if you make these. I always love hearing from you and seeing your photos. Come say hi on Instagram @wild.thistle.kitchen!
Spiced Pumpkin Scones
Ingredients
For the scones:
3 1/2 cups all-purpose flour
1/2 cup old fashioned rolled oats
2 1/2 teaspoons baking powder
1/2 teaspoon kosher salt
2 teaspoons pumpkin pie spice
1/3 cup light brown sugar
2 sticks butter, cubed and kept very cold
1 1/4 cups heavy cream
3/4 cup canned pumpkin puree (not pumpkin pie filling)
2 tablespoons molasses
1 egg
1 teaspoon vanilla extract
For the glaze:
2 cups powdered sugar
3 tablespoons very soft cream cheese
1/4 cup pumpkin puree
1 teaspoon pumpkin pie spice
1/2 teaspoon vanilla extract
2 tablespoons milk
Instructions
To make the scones, combine flour, oats, baking powder, salt, pumpkin pie spice and sugar in a large mixing bowl. Mix well, making sure to break up any brown sugar clumps. Next, add cubed butter and — with a pastry cutter or your fingers — mix until you have mostly small, pea-sized clumps of butter, evenly mixed throughout the flour mixture.
In a smaller bowl or a spouted measuring cup, combine remaining wet ingredients: cream, pumpkin puree, molasses, egg and vanilla. Whisk to combine thoroughly.
Slowly drizzle the wet mixture over the dry mixture, tossing and stirring with a fork as you pour. Make sure to stir up from the bottom so you don’t end up with a bunch of dry flour hiding.
Once you’ve poured all the wet mixture in, dump the dough onto a lightly floured surface and squeeze it together, kneading it ever so gently. If you do have some dry flour left, just press it into the dough as you’re kneading. Pat the dough out into a rough rectangle and, using a knife or a bench scraper, cut the dough in half. Stack the halves and press down again into a rough rectangle. Repeat this 2 more times.
Next, divide dough in half and press into fairly even rectangles, about 1 1/2 inches in thickness. Place them on a parchment-lined baking tray and put the tray in the freezer for 20 minutes. After 20 minutes, remove the tray from the freezer and, using a sharp knife or a bench scraper, trim any of the rough outer edges if desired, then cut each rectangle into 8 triangles. This is easiest to do by dividing the rectangle into quarters, then slicing each quarter in half diagonally. Place on parchment-lined tray and back in the freezer while you preheat the oven to 400 degrees.
Once oven is preheated, bake scones for 15 minutes. Do not be tempted to overbake. After 15 minutes, remove from oven and let cool while you prepare the glaze.
To make the glaze, put pumpkin puree and cream cheese in a bowl and whisk to combine. It is very important that the cream cheese is at a super soft room temperature. Add sugar, milk and vanilla and whisk again. If the glaze is too thick, add a bit more milk; if too thin, add a bit more powdered sugar. Drizzle over scones, sprinkle with oats and pumpkin seeds if desired and enjoy!
Note
Make ahead. You can make these up to the second freezing step. Once frozen solid, transfer to freezer safe bags or containers, then bake them off anytime you’re craving a warm scone. They bake beautifully straight from the freezer.
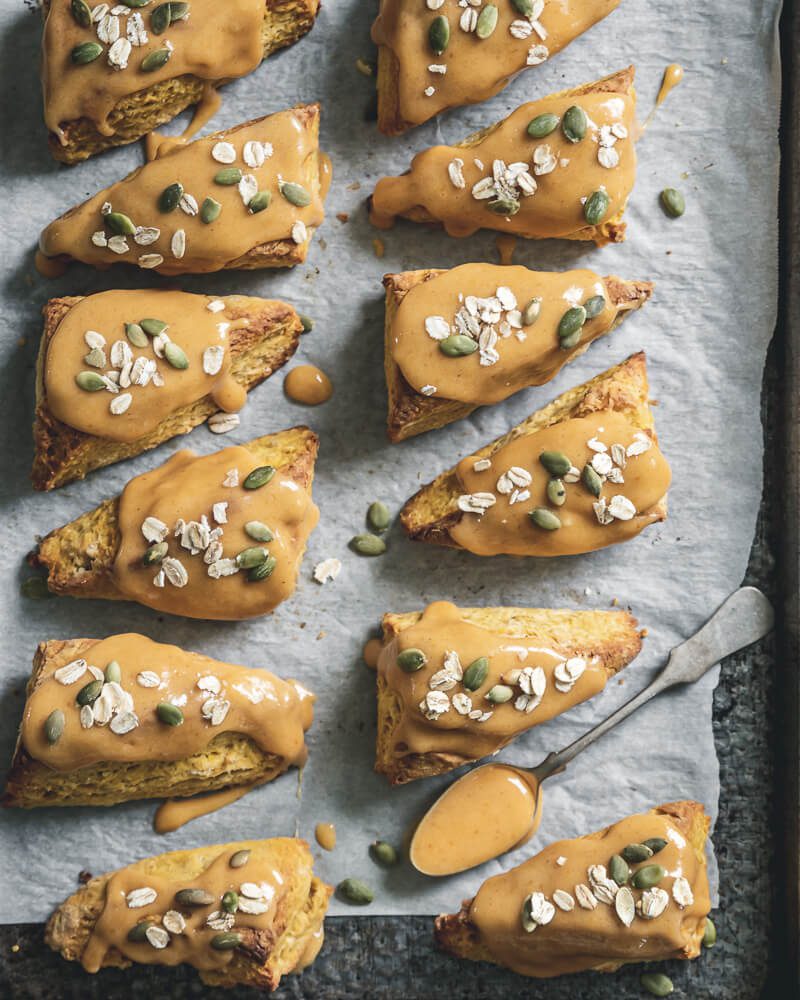
Photo by Anita Parris Soule. Courtesy Wild Thistle Kitchen.
